Category Archives: Quilt

36!

The commemorative 36 patch block:

image

Yesterday was my 36th birthday!

Last weekend, I promised Niels that I would make us a picnic quilt.  The beach blanket is great, but a quilt would be even better!  And all he’s gotten out of my newfound hobby is a Lakers pillow made with a remnant (8 months after buying said remnant) and hemming up of some oversized pillow cases, so its probably time that I made US something.

I was looking around online for inspiration for our picnic quilt, and I came upon Crazy Mom Quilts‘ 36-patch quilt along.  The whole 36 thing seemed like a bit of synergy.  And its colorful, can be done with my ever-growing stash, and I may even make it with 36 blocks, unless I think that it should be bigger!

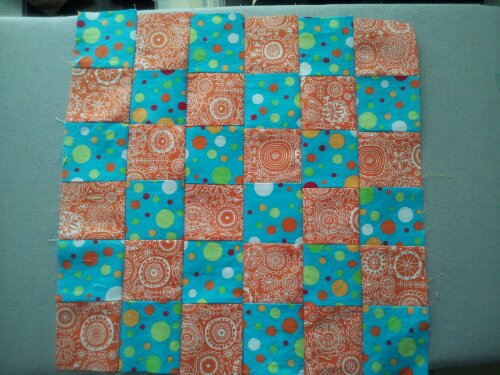
Yesterday morning I was wide awake early.  I headed downstairs, opened the couple of packages I set aside in hopes that they actually contained birthday presents (they did!) and then decided to head to the sewing machine for a bit before I had to get to work.  I finished up one little project that I’ll blog about once I clean it up…  Then I decided to test out the 36-patch, just to see how it went.  I picked out a couple of fabrics, and after a bit of cutting, ironing, pinning and sewing, voila:

With a birthday hat, of course

I made another block this morning before heading out to my “get to know your sewing machine” class – a month after I bought my new sewing machine.  Today, I actually followed the cutting directions, which made the whole process a lot easier . . .

If you told me last year that I would consider sitting down for an hour at the sewing machine a perfect part of a relaxing birthday, I would have thought you were crazy.  But here I am, really enjoying the process of creating (what I think are) beautiful things and sharing them with friends and family. But indeed, the next project is for me, for my birthday.

Ellie’s quilt DONE! And exploring the Beast.

It’s been a busy week and a half since the Beast – the new sewing machine – came into my life. The first night, I couldn’t wait to get it out of the box and try it. And then I realized that I had a lot to learn. I knew it would be fine, but I was a bit discouraged. But I’ve persevered and I’m falling for her. For example, today I replaced a button on my blouse in a matter of seconds, all because of the Beast.  (The button replacement was one of the highlights of my day – just awesome.)  And the best part – I finished Ellie’s quilt!

Gratuitous Snoopy shot

The front:

The back:

The colors of this quilt just make me smile – I’m really happy with how it came out.  I delivered it to 6-week-old Ellie and her parents today, and I’m happy it’s going to such a good home.  Sadly, it was a cloudy So Cal day this morning, so I wasn’t able to get great pictures, but I do love my quilt holder here.

It was such a joy to finish this on the Beast.  I wanted to keep it fairly simple and emphasize the framing within each block.  I didn’t do any quilting at all around the border – I used a decorative stitch to separate the sashing from the border and then went straight to binding.

I love that my machine can do this!

This week, I also went to the LA Modern Quilt Guild meeting – it’s been months since I was able to go.  Niels decided that he wanted to see what we talk about and tagged along – he was kinda impressed with some of what he saw, though I’m not sure he believed me in advance that there would be a show and tell…  He also won one of the giveaways for me, so it was worth it to bring him along :)  Angela Walters from Quilting is My Therapy spoke and showed her amazing quilting and really inspired me to try branching out and think about the design of my quilting, and not just think about covering the space.  I say “inspired” now, but I’m sure there will be a lot of frustration coming.

The LAMQG also announced that they’re running a challenge with Habitat fabrics by Jay McCarroll, and I’m already thinking about how I can expand my skills and produce something great interesting.  I’ll try to post some updates as I move along through it.

Ellie’s quilt was based on the pattern here, but modified.

Have walking foot, will travel

It’s been a few crazy weeks here – tons of work and some travel, and not enough time for sewing. I had high hopes that I’d finish the pinwheel quilt for mom prior to going for a visit today… didn’t happen. So then I thought – mom has sewing machine! I’m 90% confident that my machine’s presser feet will fit on her machine, so I’m packing up the operation and moving it to Cleveland for the week! with two more hours finishing the quilting, I’ll move to binding, and I won’t even have to deal with shipping!


All packed!

It’s all packed to go. I really hope that I don’t have to carry it back! Next time you see it, it’ll look a bit more complete.  Oh, and I showed the Machingers package because they rock.  If you’re new to free motion quilting and you don’t have a pair, get some.

Almost there . . .

Pinwheels, finally.

Back in November, I was visiting my mom.  I had pretty much completed my first quilt top, and I was trying to decide what the next project would be.  Looking at pictures, we were both struck by jewel tones paired with black, and came across a pindot pinwheel pattern that may work.  It was agreed – this would be a quilt for mom.

Mom's pinwheel top

Between the cutting (hours and hours of cutting) and piecing, I finally finished the quilt top a few months ago. It’s messy.  It doesn’t always match at the seams.  It was a stupid thing to try to tackle for a second attempt at a quilt top.  But it is what it is!  And this week, I will actually finish the quilt!  She’s been very patient….

After getting squirrel’s quilt sent off, I came up with an idea to solve a problem that kept me from finishing mom’s quilt – I didn’t have quite enough backing.  So I created a panel to finish the back and tie in the colors from the front.

The solution!

It’s too nice of a day around here to quilt this today, but it’ll happen this week.

The SECOND quilt

I’m working on the binding for the brown/yellow/blue quilt (I call it the “squirrel” quilt for reasons that will be apparent very soon!), here’s a look at a quilt I finished last month.

Duckies!

Lots of friends are having babies right now, so I’m using their kids as a chance to practice…


I had a quilting kit from Joann’s that I thought would be perfect for a gender-neutral quilt. Except I found the pattern quite boring – a border of squares around a big solid center. I also found that I didn’t like some of the fabrics in the quilt, as least not for use here. Finding the BUYING of fabric to be most favorite part of quilting, I’d already started building a stash, so the entire top was fully a stash-busting effort. I decided to go with a simple strip piecing, and cut a bunch of 3″ strips that I pieced together, and I had the top basically finished in 2 days. I found this happy background fabric, which carried over the bubble/dot theme that was most prominent on the front.

Happy dots

Then I broke out the free motion foot. I did some practicing, found a groove, and quilted nearly the entire top in one night in this strange variation of a stipple. I’d like to get better (MUCH better) at it, but I was really happy with the first attempt. Within 2 nights, the quilt was quilted, and then it was just a matter of binding. I believe I’m the world’s SLOWEST binder (hand sewing takes me FOREVER), but I’m not yet confident enough that I can pull off a machine-binding technique.

I had hoped to finish the quilt in time for the baby shower, but I was about 10 inches short of finishing the binding when the day came around. So I wrapped the quilt up with a note that I was going to take it home and finish it!! The parents are super efficient, so I actually had the THANK YOU note for the quilt before I had it in the mail to them! (In my defense, the TY note arrived 2 days after the shower. The quilt – washed and ready – went out on the 3rd day).

Here’s the finished product:

Snoopy tested and approved


This week’s project

Beginning of the cutting

It’d been a little bit of time since I had the sewing machine out. Between prepping for an out of town meeting and being out of town, I was up to almost 2 weeks of no sewing. I was really looking forward to getting back (I have this fear that I’ve forgotten how to free motion quilt, but we’ll get to that one later) and getting something done. Top priority: the quilt for the baby coming in April. I found the fabric a couple of months ago, so once I decided on a pattern, I was ready to go. Not being too satisfied with my improv piecing abilities, I decided on a block-based square based on a quilt I saw on the internet. I did some calculations and started cutting.

The cutting is complete

Sunday morning, I wake up and it’s a little rainy, so I proceed to cut some more and get everything ready. You can see all of my nice little piles, with post it notes and counts, lined up on my ironing board waiting for me. This is definitely one of the bigger lessons I’ve already learned – PLAN out the quilt, cutting and all. If only I were this organized in all aspects of my life!!

Starting to come together

During the evenings this week, I sewed pieces together in bunches. My favorite time (and thread!) saving trick is to chain the various pieces together by not cutting the thread after I complete the stitching of each piece. I just pull a bit of extra thread and put the next piece in… The picture above shows a chain in progress of my 30 blocks. And my trusty little machine. Her name is Flossy.

A couple of nights ago, I actually finished piecing the entire top, so all that’s left now is basting it all together and quilting. I’ve decided to go with a geometric zigzag – I hope I can pull it off! More pics to come . . .


For a person who works with the Internet . . .

This shouldn’t be that hard!  Instead of quilting, catching up on work, doing my taxes, or unpacking from last week’s trip, I just spent who knows how long trying to figure out how to make this page work the way I want it to . . . almost.  I guess it’s a work in progress, just like my quilting!

Speaking of works in progress, here’s my first quilt top.

First quilt top

I made this with those 10 yards for $20 find on the day I decided to start quilting.  It’s a pattern from great little book with great pics and a few beginner patterns, called Quilting Made Simple.  Of course, it’s the most intricate pattern in the book, but I didn’t let it stop me.  As I was piecing the top together, at every step I’d run into the next room and show Niels the strip or block or row I’d just completed …  Again, he’s patient with me!

This is also the quilt that I spent hours pulling stitches out of when I wound up gathering the back together in my first attempt at quilting with my walking foot. . .   Since then, I’ve been avoiding it. Ergh. But I think I’l be more willing to experiment with piecing together something interesting for the back when I return to this piece – some random offsets of black, red and white will really complement the front better than the flat yellow I picked out.

A completed quilt!

My favorite model

After completing a couple of quilt tops and getting the basics of piecing down (pictures of those to come – they are still works in progress) I decided it was time to make a gift.  It also gave me my first chance to make a quilt with SNOOPY.  My cousin – with whom I share a love of Snoopy – was expecting her second child.  Benjamin has since joined the world, but at the time, we didn’t know if he was a boy or a girl, so I tried to keep the colors neutral.  I think I learned a LOT about color design ideas from seeing the finished product . . .

I did some searching online for modern baby quilts, and decided I really liked this framed block look.  I did some calculations, came up with my cuts, and proceeded to my trusty cutting mat.  After getting the blocks together, I had my first challenge piecing it together.  My design wall is actually my design floor.  My biggest critic (and fan!), Niels, kept suggesting ways to make some order and symmetry out of the top.  All I knew was that I wanted it random.  We compromised on having each of the corner squares framed in the same blue.  So then I started putting it together.

Snoopy approves

Here it is in process.  My ironing board is behind my sewing chair.  On the other side of the ironing board is our guard dog, a five foot Snoopy.  He seems to be happy with my progress.  And yes, Niels is quite patient.  Not only does he not object to the five foot stuffed animal in our dining room . . .  he’s been fairly relaxed about the whole “our dining room is now a sewing room” thing.

Once I finished the quilt top, I stopped.  My one previous attempt at using my walking foot on something bigger than a placemat ended with about an hour of stitch pulling after the fabric gathered together.  I was scared.  I signed up for a free motion quilting class (more on that later) and tried to gather the courage to finish the quilt.  Benjamin was born the weekend of the free motion quilting class, so the time pressure to complete it before he was born – gone.  Phew.

When I got home from the class, I practiced free motion quilting.  And practiced.  But I was still gun shy.  So I broke the walking foot back out, used a lot of pins for the basting, and remembered by previous error of not starting in the center.  I used a Sulky Blendable in a green-blue-yellow for the top (I’ve also given up on the monofilament thread that breaks in my machine) and went for it.  Relying on my trusty quilting guide, I wound up with this grid pattern, leaving the center blocks untouched.  I love the way it looks on the back.  Onto my first binding exercise, I found the fabric I had the most of from the top, and when at it, throwing in a little bit of brown for some interest.  Though I’d read about the hand sewing to finish the binding, I hadn’t realized what a big job it was!  Hours and hours later (and appreciating the wonders of the thimble), I finally finished.  I was so excited when I saw how FINISHED the binding looked – I didn’t know I could make something that looked so orderly and neat!

I crossed my fingers, threw it into the washing machine, and hoped it would stay intact.  It did!  Even Niels was impressed with how it looked when it came together.  I was so proud!  I proceeded to my first photo shoot in the front yard.  I couldn’t keep Snoopy off it.  I sense you’ll see him in more shoots.  I do have to figure out how to take some good pics of my work. . .   So the quilt was sent to its new home, and I gained so much confidence.

The back

The back - a good view of the grid

Benjamin's front

The finished front - Snoopy and all